


Clone Propagation Kits – Everything You Need to Turn Cuttings into Clones
Start your cloning journey the right way. Our Clone Propagation Kits bundle the proven essentials for clean cuts, high strike rates, and smooth rooting. Choose from three versions to match your setup: Basic (no light), Omega G100 Spectra Kit, and Omega LED Strip (Pair) Kit.
Please Note: We've updated our kits, so the featured images may differ slightly from the kit contents - the lists below are the definitive contents for each kit.
Kit Options & Contents
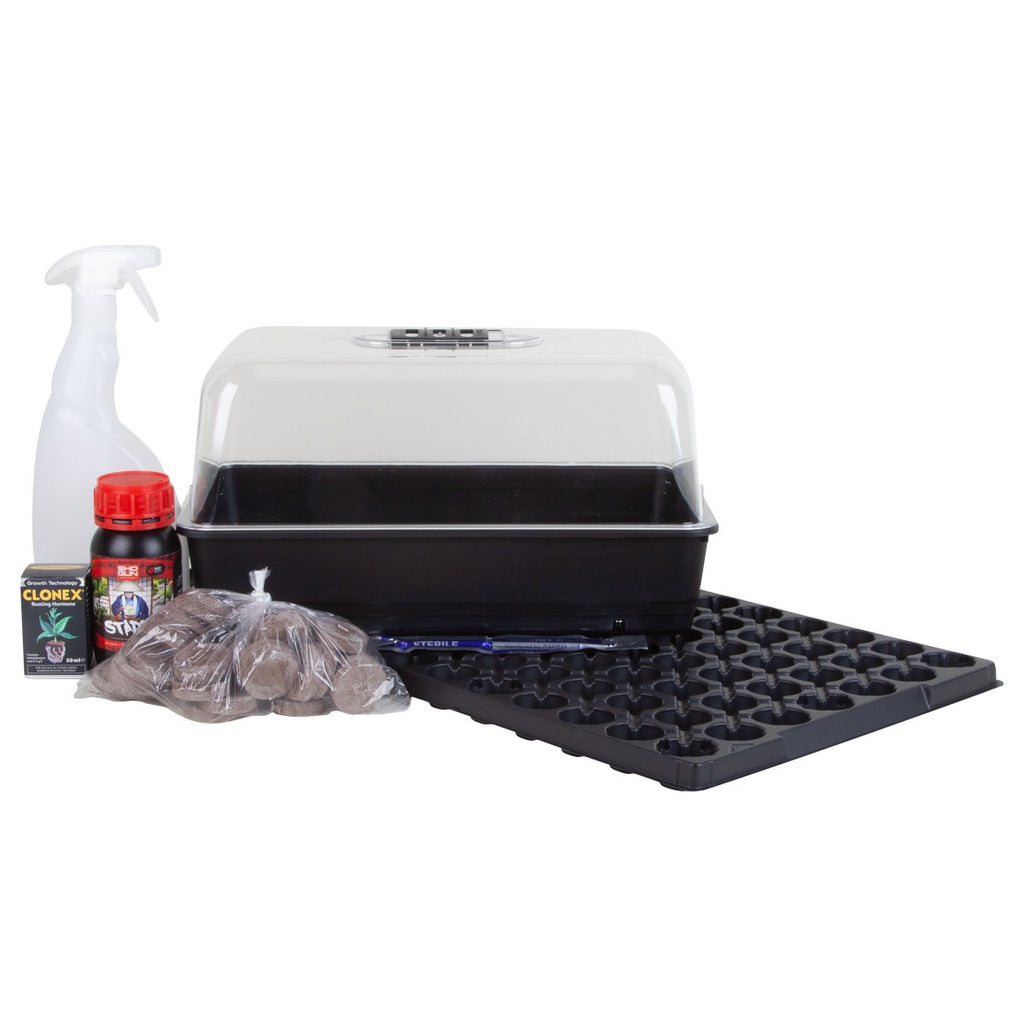
Basic Propagation Kit (No Light)
- Grow Tools Unheated Propagator; 10cm (H) × 55cm (L) × 29cm (W) with adjustable vents
- Sterile scalpel + handle; clean, precise cuts for best strike rates
- Clonex Rooting Gel 50ml; seals wounds and stimulates rapid root initiation
- Pistol spray gun; fine misting for consistent humidity
- Shogun Start 250ml; gentle early support; ideal as a light foliar
- 2 × 24-cell Eazy Plug trays; 48 plugs total; pre-formed rooting cubes for even moisture and fast rooting
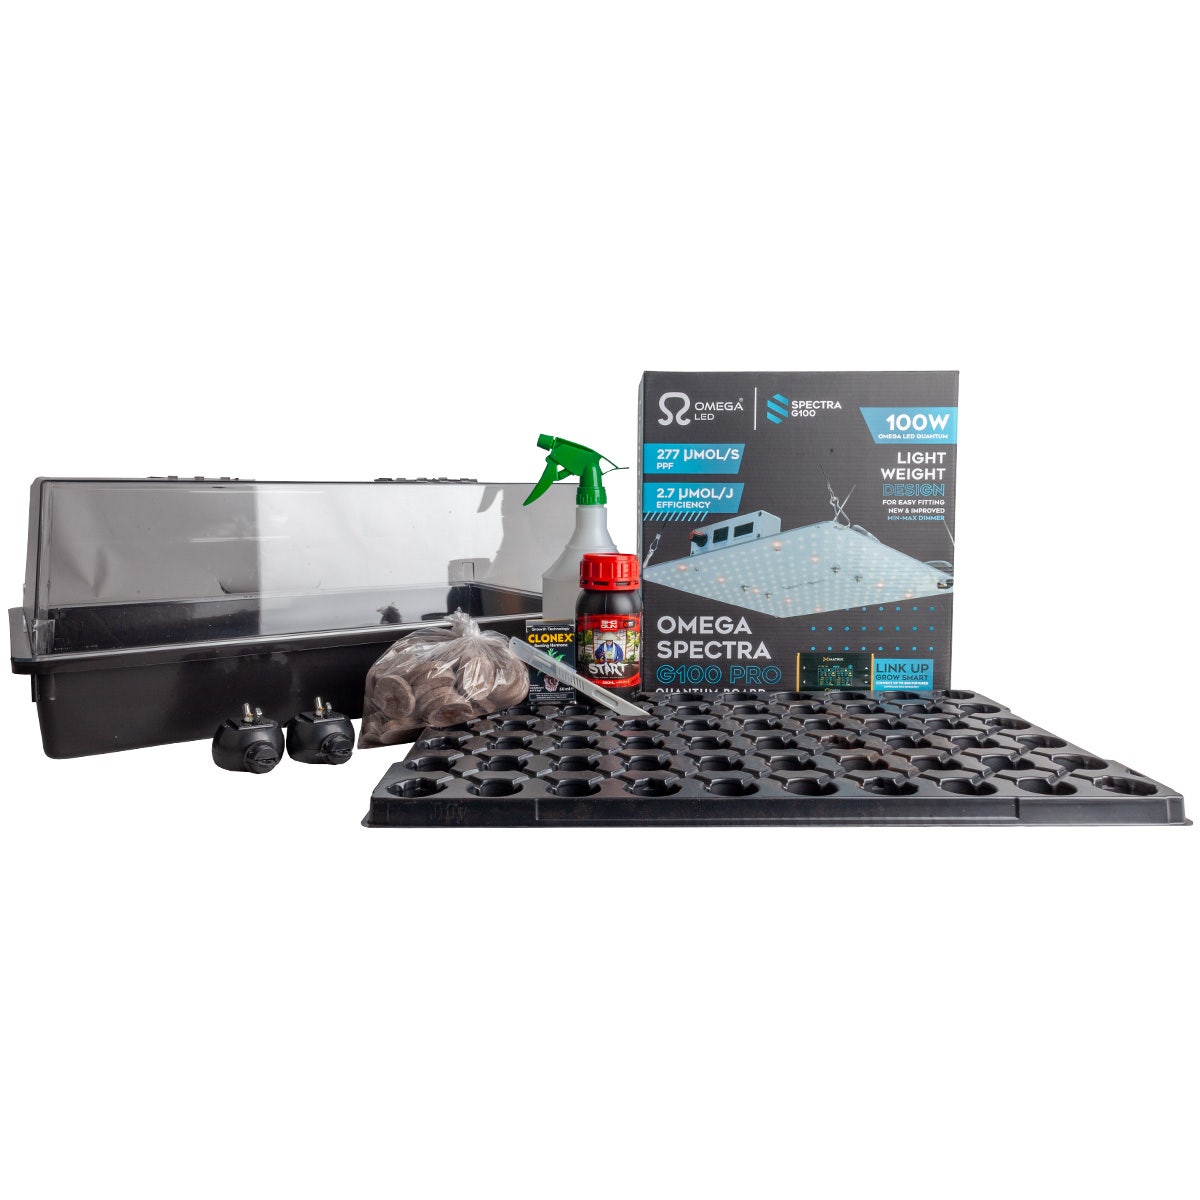
Omega G100 Spectra Kit
- Grow Tools Unheated Propagator; 10cm (H) × 55cm (L) × 29cm (W) with adjustable vents
- Omega G100 Spectra LED; low-heat propagation lighting with dimmable output
- Grow Tools EZI-Roll Light Hangers; smooth and adjustable light positioning
- Sterile scalpel + handle
- Clonex Rooting Gel 50ml
- Pistol spray gun
- Shogun Start 250ml
- 2 × 24-cell Eazy Plug trays (48 plugs total)
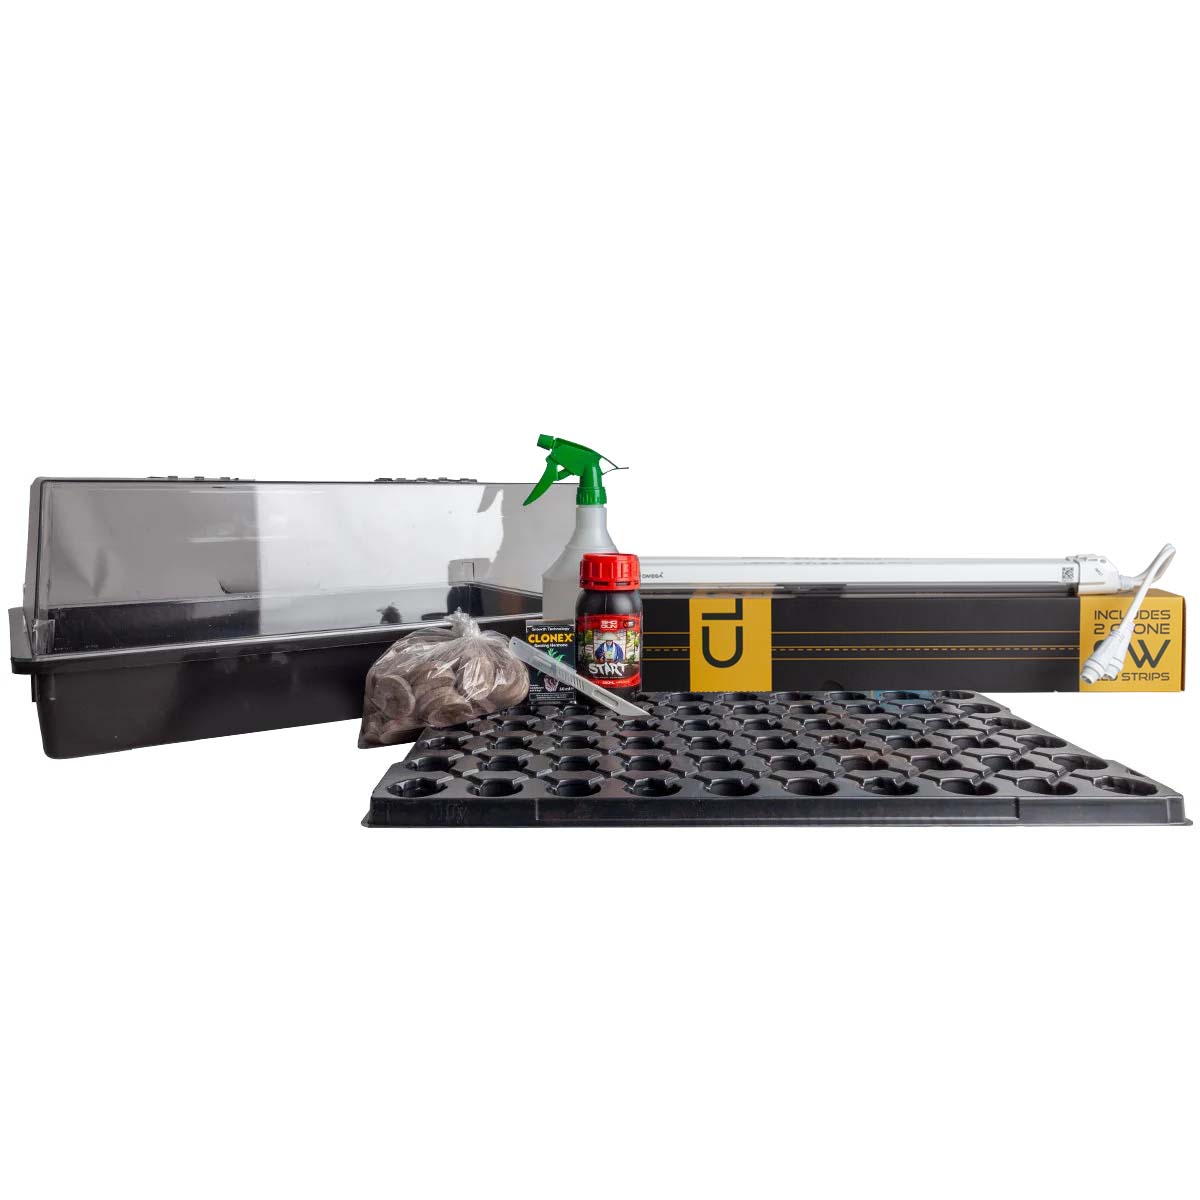
Omega Strip (Pair) Kit
- Grow Tools Unheated Propagator; 10cm (H) × 55cm (L) × 29cm (W) with adjustable vents
- Pair of Omega LED propagation strips; even canopy coverage; cool-running for tight spaces
- Sterile scalpel + handle
- Clonex Rooting Gel 50ml
- Pistol spray gun
- Shogun Start 250ml
- 2 × 24-cell Eazy Plug trays (48 plugs total)
How to Set Up
- Prep the plugs: Moisten the Eazy Plugs with plain, room-temperature water (they should be damp, not saturated). Let excess drain.
- Load the propagator: Place the two 24-cell trays inside the propagator base. Fit the clear lid and close vents.
- Set the light (Omega kits): Hang the light using the Grow Tools EZI-Roll Light Hangers or place your Omega LED Strips on your propagator. Start high and dim to avoid stress; aim for a gentle 100–200 PPFD over the dome. Typical starting height is 18–24″ above the propagator; lower and brighten gradually as cuttings establish.
- Prepare your tools: Clean your scissors or secateurs, and use the sterile scalpel for the final cut at the node.
How to Take Cuttings (Quick Guide)
- Choose material: Select healthy, pest-free shoots with firm stems from your mother plant. Avoid soft or overly woody tips.
- Final cut: Make a clean 45° cut just below a node using the sterile scalpel. Remove lower leaves, leaving only two or three small fans at the top.
- Gel and plant: Dip 5–10mm of the stem into Clonex (never double-dip directly into the bottle). Insert into the plug’s pre-formed hole, ensuring it fits snugly.
- Humidity & mist: Place cuttings in the propagator and mist the inside of the dome using the pistol sprayer. Mix Shogun Start at 4ml/L for a light foliar spray once or twice daily for the first few days.
- Vent in stages: Keep vents closed for 48–72 hours, then gradually open them a little more each day to reduce humidity and harden off plants.
- Moisture management: Keep plugs evenly moist, not waterlogged. If they start to feel light, add a small amount of water around the base.
- Light management: Keep lighting low and gentle at first. Increase brightness and lower the fixture slightly as plants regain turgor and new growth appears.
-
Transplant: When roots show through the plugs (typically 7–14 days), transplant into soil, coco, or your hydroponic system.
Pro Tips for Higher Strike Rates
- Stay clean: Always sterilise blades and surfaces before working with cuttings to avoid contamination.
- Temperature & humidity: Aim for 22–24°C air temperature and 95% relative humidity initially, stepping down to 75–80% after 5–7 days.
- Light misting: Avoid overwatering or heavy misting — damp, not soaked, is key.
- Keep notes: Track strain, date, and any changes you make — small details improve consistency over time.
Contains
Basic Propagation Kit (No Light)
1 x Grow Tools Budget Propagator (54cm x 28cm x 20cm)
1 x 84 Hole Plastic Tray & Jiffy 7 Plugs
1 x Sterile Scalpel And Handle
1 x Clonex Gel 50ml
1 x Pistol Spray Gun 750ml
1 x Shogun Fertilisers Start 250ml
Basic Propagation Kit
1 x Grow Tools Budget Propagator (54cm x 28cm x 20cm)
1 x Bag of 50 Loose Jiffy 7 Soil Plugs
1 x 84 Hole Plastic Tray for Jiffy 7 Plugs
1 x 125 Watt CFL Lamp Deep Blue
1 x CFL Lamp Hanger With Moulded Plug
1 x Sterile Scalpel And Handle
1 x Clonex Gel 50ml
1 x Pistol Spray Gun 750ml
1 x Shogun Fertilisers Start 250ml
Deluxe Propagation Kit
1 x Grow Tools Budget Propagator (54cm x 28cm x 20cm)
1 x Bag of 50 Loose Jiffy 7 Soil Plugs
1 x 84 Hole Plastic Tray for Jiffy 7 Plugs
1 x LightWave T5 96w (4 x 2ft Tubes) Grow Light
1 x Pair of Easy Rolls with Hooks
1 x Sterile Scalpel And Handle
1 x Clonex Gel 50ml
1 x Pistol Spray Gun 750ml
1 x Shogun Fertilisers Start 250ml
Omega LED Clone Strip Kit
1 x Grow Tools Budget Propagator (54cm x 28cm x 20cm)
1 x Bag of 50 Loose Jiffy 7 Soil Plugs
1 x 84 Hole Plastic Tray for Jiffy 7 Plugs
1 x Omega 9 Watt LED Clone Strips (Pair)
1 x Sterile Scalpel And Handle
1 x Clonex Gel 50ml
1 x Pistol Spray Gun 750ml
1 x Shogun Fertilisers Start 250ml
G100 Spectra Propagation Kit
1 x Grow Tools Budget Propagator (54cm x 28cm x 20cm)
1 x Bag of 50 Loose Jiffy 7 Soil Plugs
1 x 84 Hole Plastic Tray for Jiffy 7 Plugs
1 x Omega Spectra G100 LED Grow Light
1 x Pair of Easy Rolls with Hooks
1 x Sterile Scalpel And Handle
1 x Clonex Gel 50ml
1 x Pistol Spray Gun 750ml
1 x Shogun Fertilisers Start 250ml
About
- Faster root growth, better strike rates and quicker turnaround times!
- Made from tough, durable, crack-resistant plastic
- Easy to set-up and maintain - requires no growing medium
- Comes with the excellent Omega Spectra Quantum LED board
- Comes with a Hailea Tank Heater to keep nutrient temps optimal
- Kit comes in a range of sizes to fit virtually any space
- Includes Clonex and a scalpel to help you take your cuttings
How To Use
Before taking cuttings for the first time, it is a good idea to familiarize yourself with the process by reading one of our free guides. Follow this as closely as you can, keeping everything clean to avoid contamination. If you require any further advice, please give us a call — our friendly staff will be happy to help.
Here's a brief guide:
Cut the 84-hole tray to fit into the bottom of the propagator. Soak the Jiffy 7 rooting cubes in water for half an hour or so until fully swollen. Place the rooting cubes into the tray in the bottom of the propagator. Choose healthy shoots with thick stems from which to take your cuttings and make the last cut with your Sterile Scalpel & Handle. Dip the cut end into the Clonex rooting gel and then place the end of the cutting into one of the rooting plugs. When you have finished taking your cuttings, put the lid on your propagator and move to your propagation space which should be a mild environment. Keep the rooting plugs moist. Regularly mist your cuttings with water or preferably Shogun Start using the pistol spray gun. After a few days gradually open up the ventilation slots on the lid of your propagator to reduce humidity. When your cuttings have rooted through the plugs, they can then be placed in soil, coco or a hydroponics system to grow larger.
We're the kings of stealth shipping! All of our orders are sent out in plain mailer bags or boxes with no mention of the company name for ultimate discretion.
Mainland UK Next Day Shipping will be with you the next day if ordered before 2pm. Our standard shipping is dispatched within 4 days.
We always aim for make sure our customers love our products, but if you do need to return an order, our 24/7 returns portal makes it incredibly easy. Just visit onestopgrowshop.co.uk/returns
Yes, we ship all over the world. Shipping costs will apply, and will be added at checkout. If you have any issues with shipping to your particular country, get in touch with customerservices@onestopgrowshop.co.uk and we'll create you a bespoke shipping quote.