How to Set Up Grow Tent Ventilation
A grow tent extraction system consists of 3 main parts - the carbon filter, the duct fan and the ducting, although duct clips and/or a fast clamp are also necessary.
The duct fans that we include in our Essentials kits are very easy to set up. With some duct fans, such as RVKs, it is necessary to wire in a power cable. The reason for this is that they are considered to be professional pieces of equipment which are generally installed and used to provide ventilation in an area which is often a business or is somehow commercial in nature.
RAM duct fans avoid this because power is fed by an IEC (kettle-type) lead. This can then be plugged straight into the mains.
Assembling the parts
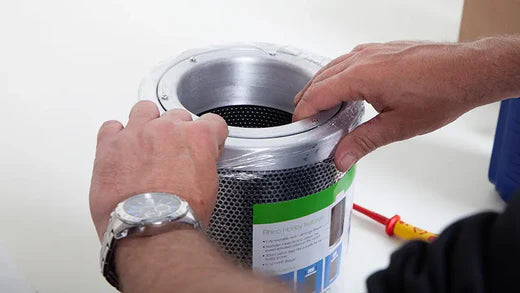
First of all we need to prepare the carbon filter. First of all, remove the plastic layer from around the unit.
Rhino Hobby filters are supplied with the flange plate reversed (upside down) in order to reduce the size of the packaging.
Remove the 6 screws on the plate, turn the flange plate over, and screw the plate back in place with the flange facing upwards.
After that, slide the dust cover over it.
In order to connect the carbon filter and the fan together we will need a short section of ducting. Get yourself ready with a pair of tin-snips and a pair of scissors.
Stretch out about 6 inches of the end of your ducting. Insert one blade of the scissors through the foil and cut around the circumference of the ducting one time.
Because the wire is a spiral, the cut will not meet. Instead, the cut will almost meet but will be separated by the wire. Using tin snips or wire cutters, cut the wire in the ducting at the point where the cut ducting is either side of it. This will separate the ducting parts.
Next, the jack chain needs to be separated into 2 equal halves so that they can be used to hang the extraction system - one length for each end. Take the two ends of the length of jack chain and hold them together. Let the folded end hang down. The fold indicates the half-way point. Using a pair of pliers, open the link closest to that point and separate the two lengths of chain. Use the pliers to close up the link again.
The 6 inch cut-off length of ducting will be used to join the carbon filter to the duct fan using 2 of the duct clips. Put a duct clip over each end of the small section of ducting.
The carbon filter and the fan can be hung next to each other from a hanging rail at the back of the tent and then joined together in situ in the manner described below. For clarity, we show here how to do this but while they are outside of the tent.
Slide one end of the ducting over the flange on the carbon filter as far as it will go. Firmly tighten the screw on the duct clip with a screwdriver to fix the ducting in place.
On the surface of the duct fan there is an arrow. It indicates the direction of the air flow. Make sure that this arrow points away from the carbon filter. The air must always be sucked through a carbon filter and never blown through it. It is very important you fit the duct fan the right way around!
So, with the air direction arrow pointing away from the carbon filter, slide the other end of the short section of ducting all the way over the flange on the duct fan. Secure it in place using the second duct clip. Slide the long length of ducting over the other end of the duct fan and secure it with the last duct clip.
Make sure that there is a hanging rail running left to right about 6 inches from the rear wall of the grow tent. If you prefer, the hanging rail for the extraction system can be run front to back but make sure it is right over to one side to leave space for the grow light which will need to be hung centrally. The extraction system needs to be installed high up because one of its primary purposes is to remove warm air. Hot air rises, so the system will be most effective installed at the top of the tent. Also, before installing the extraction system ensure that a hanging rail is fitted running from front to back down the middle of the tent to hang the grow light from later. It will be awkward to fit the second hanging rail once the extraction system is in.
Next, arm yourself with your pair of pliers and a good friend. If the fan and filter have been connected together outside of the tent then they will need to be lifted up while they are hung in place by the jack chain and straps. This is a far easier job with 2 people! If at all possible, we recommend you hang them while they are not connected together. It can be done by one person and the job will be much, much easier.
Prepare the jack chain by opening out the last link on one of the ends of each of the lengths of jack chain. Feed the lengths of jack chain over the rear hanging rail.
Open up the double ducting sock in the grow tent you would like the extraction system to duct through by releasing the cord-grip and opening out the socks.
Hang the fan and filter up as close to the rear hanging rail as possible. Use the hanging straps that came with the grow tent to support the filter and use the jack chain to support the duct fan. Remember to close the open jack chain links with your pliers once it has been done. Connect the fan and the filter together in the manner described above. The extraction system should now hang from the hanging rail on its own.
Feed the ducting through the double duct sock. Press the button in on the cord-grip and pull the cord tight around the ducting. Repeat for the other duct-sock. Run the ducting to the extraction point in your room making sure to pull the ducting taut as this will considerably reduce the wind noise coming from it.
Your extraction system is now installed. All that remains to be done is to plug it in and then switch it on when the rest of the tent is set up and your plants are ready to go in.
The Mammoth TT duct fan has a switch which allows you to choose between low and high fan speed, or "off". This allows you have the fan running at full speed when needed, for example during the warm summer months. It allows the user to turn it onto low when full speed is not required, for example during the winter months. This also helps to reduce the sound level down as well.
As time goes by, many growers choose to invest in a fan speed controller. This might be a manual type or a temperature controlled type. They ensure the fan only runs at the speed they need to keep temps from getting too high, rather than running at full speed all the time. This helps to keep the fan noise down to a minimum. They also help to stop grow space temperatures getting too low during the colder times of the year.